Pirate Invasion, Level 4


Last edited by HoshiIsamu:
+CategoryLevel4
Mon, 31 Jan 2011 12:21 EST

Faction: Angel Cartel
Mission type: Encounter
Space type: Deadspace (Usage MWD allowed)
Damage dealt: Exp/Kin, Therm (Gist Saint)
Web/scramble: Elite Frigates
Extras: NA
Recommended damage dealing: Explosive (Primary), Kinetic (Secondary)
Recommended ships: Machariel, Vargur, Tengu, Sleipnir, Raven
Video: http://www.youtube.com/watch?v=p4QRXRmgh14
Alternative (Shorter) Video: http://www.youtube.com/watch?v=-PyYo4QmQbc

Note: Proximity aggro is a major factor in this mission. Please be aware that you can aggro a neutral group by just moving into its aggro bubble.
Drones can be deployed as per normal as long as the conditions are met. See Aggro Notes.

Single Pocket


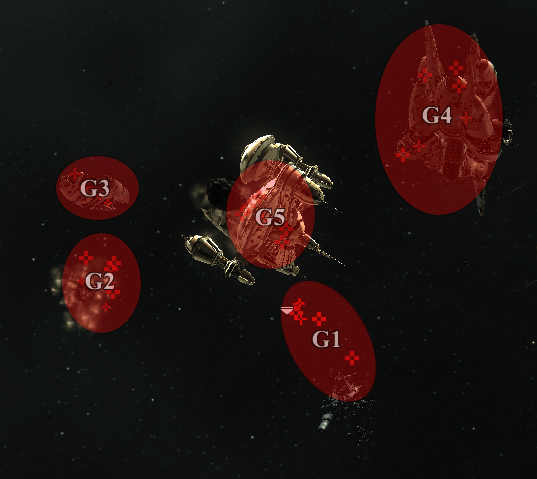
At warp-in, you will see Group 4. Four other groups will spawn several seconds later.
The spawn order is Group 2, Group 1, Group 3 and finally Group 5.

It is recommended that you DO NOT MOVE your ship.
The proximity aggro bubble for Group 4 is about 80km and you may get aggroed EITHER during warp-in or if you move towards it.

Group 1 & 5 will auto-aggro immediately.
Group 2, 3 & 4 will remain neutral until attacked or aggroed via proximity.

Warning

Aggro Notes:

text

Group 1 (Auto-aggro): Ripped Superstructure (25-35km)

2x Elite Frigates (Arch Gistii Rogue/Hijacker) Web/Scramble
2x Battlecruisers (Gistatis Tribuni)
3x Battleships (Gist Warlord/Saint/Nephilim)

Group 2: Spaceshuttle Wreck (45-60km)

3x Destroyers (Gistior Haunter/Defiler)
4x Battleships (Gist Commander/General)

Group 3: Amarr Trade Station Ruins (60-70km)

2x Elite Frigates (Arch Gistii Hijacker) Web/Scramble
2x Elite Cruisers (Arch Gistum Liquidator/Marauder)

Group 4: Amarr Military Station Ruins (65-90km)

2x Battlecruisers (Gistatis Praefectus/Tribunus)
4x Battleships (Gist Commander/General/War General/Warlord)

Group 5 (Auto-aggro): Amarr Commercial Station Ruins (80-105km)

6x Battleships (Gist Commander/General/War General)

Tip

Blitz

CategoryLevel4
Comments [Hide comments/form]
Possibly the most difficult mission I have ever completed. Dual repper Domi, had to warp out approximately 4 times. With the random aggro, had all of the Machs circling me. Had to warp in, kill 1 Mach, warp out, dock, repeat until I could handle the DPS.
-- JennvanaaSallen (2008-05-28 19:19:00)
I've just done this and didn't need to take on the final group listed above.
Started as per EVE Survival to avoid massive aggro, after the first group I hit the Generals/Commanders - no aggro from remaining group at 80K and after taking out the 2nd group got Objective achieved.
-- TzeMallory (2008-07-05 19:10:40)
Confirming you only need to kill the first two groups to complete the objective
-- HeHulk (2008-07-12 15:59:37)
This mission is not as hard as JennvanaaSallen says. I did it fine with a single repper Typhoon, which is nowhere near as good as a Dominix or Raven at mission running. I did not have to warp out. Take out the initial aggro, then aggro the rest of the groups when ready. All I did was move away from the other spawns while fighting in case the drones got aggro.
-- VladimirNabokov (2008-07-17 04:33:39)
Not nearly as hard as JennvanaaSallen says at all. I have completed it multiple times in a myrmidon. And yes, you need not kill the final group.
-- DeimosBarret (2008-08-06 05:36:24)
My first warp-in positioned me so that I had full aggro from all groups within the first 30 seconds without ever having moved. I warped out and tried again. This time I got aggroed only by group 1. My drones also did not get aggroed by anything else. Full aggro would support JennvanaaSallen's view, however. 17 battleships in total is quite a handfull.
-- LiviaCatarella (2008-08-25 18:12:09)
Followed the aggro guide as stated, group 4 didn't even aggro me when I attacked group 5. DPS was very low in a Raven with 1x Invul, 1x Kin, 1x exp

One thing to note is to make sure you let all the groups spawn and the ones that auto-aggro you start shooting you before you start shooting things
-- StinkieHippie (2008-10-05 15:34:24)
For gallente ship pilots.
On a mega, tanking: 1 LARt2, 2x Exp, 1xKin, 1DCU its more than enough can tank 2 groups without warping out w/ overall resists of ~80%.

On a side note, its a blaster friendly mission, most pirates will get within 15km range. Save the HACs.
-- SilentSkills (2008-11-06 13:47:16)
Completed in a active tanked Drake running only 1 invuln.
-- BugaBuga (2009-01-01 10:19:29)
Easily done in a dominix: 1 LARt2, 2x Exp, 1xKin, 1xTherm
Bring Eplosive-Drones (Berserker/Valkyrie/Warrior/Bouncer) for best damage

I only got partial aggro from group 5 on warp-in (from three BS) for some reason, but they're pretty far out anyway. Takes ages for them to get in shooting range.
-- CreatPosudol (2009-03-14 00:21:03)
Use medium or light drones to tank the battleship and battleship + battlecruiser groups. They are too small and fast to be damaged and it means you can tank the rest of the mission without warping.
-- SharriAtal (2009-03-31 16:58:42)
dual-LAR abaddon and not a worry.
-- XoddHil (2009-05-11 15:31:45)
Well all I can say is "Passive Shield Tank Ishtar ftw". Big Time.

This is now a really easy misison limited by my drone skills ability to take them down fast enough...
-- TzeMallory (2009-05-17 14:29:35)
Completed Pulse Navy Apoc, single Amarr LAR+rig, no warpouts: 1xKin, 1xTherm, 2x explosive; AB, tracking computer. Two faction heatsinks made me wish for three. Highly recommend the AB. Drone aggro can be surprising, keep an eye on them. Be aware that the battleships can do a lot of damage if they get in close--and on an Amarr ship, you'll have to use close-range ammo for good dps from EM/Therm.
-- JackUnderhill (2009-06-21 12:36:21)
I did this in a Buffer Tanked Raven. I would Suggest torps (If you want to wait long enough) As the BS's DO come into range. I haven't tested if it would be quicker or not though :) But it might help get the closer BS's off you when you accidently pull off alot of aggro.
-- CizziIII (2009-07-11 04:51:39)
Did this in a passive shield Drake with all T2 Shield Hardeners. Only had to warp out once on Group 1 after taking down the frigates and cruisers. Shields never dropped below 75% after that.
-- Nico42666 (2009-07-12 17:13:02)
22 Veldspar Roids - 90k-120k each.
-- DraguzulFriend (2009-07-17 01:37:11)
Pocket 1: Flew away from them in my T2 fitted Rokh. Read the guide. (normal difficulty)

Bounty: 8 mill
Mission: 1,8 mill
Loot and salvage: 12,7 mill
Total: 22,5 mill
-- MrT (2009-08-27 15:22:06)
Ran this mish on 9/24/09, and MWDs now are able to be used. Did it in a dual repped domi with 4 active hardeners and didn't have any issues as long as I managed which groups were aggroed.
-- BlazieB (2009-09-24 14:58:58)
Done is a golem. Time: 10 minutes 42 seconds.

http://www.youtube.com/watch?v=p4QRXRmgh14
-- GreenGimp (2009-10-10 19:59:07)
Done in a Megathron. Very easy, after initial group, didn't take any damage to armor.
Salvage includes tritanium bars and circuit boards and about 500m3 of loot.
-- MrTetsuo (2009-10-30 11:31:10)
Done in passive tanked Hurricane
-- VaerahVahrokha (2009-11-22 16:37:27)
Did this in a faction fitted, T2 AC Machariel. Very easy, manage aggro and use faction Fusion or Barrage as the situation dictates, you'll chew right through them.
-- ForteEXE (2009-12-10 04:31:51)
After further timing and experimenting, Barrage is no longer necessary. You have enough range in a Machariel. And if your setup includes an AB you'll have no issues getting into said range.

RF Fusion is the order of the day.
-- ForteEXE (2009-12-24 00:32:41)
Kept up with the damage fairly well with my large T2 shield booster.

Explosive cruise missiles, shoot what's shooting you, mind you're not scrammed, just in case, and this mish flew by. Nice bounty machine.
-- AsdayXyfu (2010-01-02 03:41:07)
Super easily done with arty Maelstrom with AB, x-large booster (any will do), exp + kin hardeners II + inv field II, shield boost amp, 3 gyros, 2 TE, 1 DC

1) Arrive to mission
2) Point ship up or basically towards the largest open space you see
3) Use AB
4) Once scram frigates are at 25km feel free to launch drones and kill them
5) Then launch larger drones on BCs
6) Doing so, both group 1 and 5 will mesh up nicely and be at the right range right in time to nicely kill them one by one at 40ish km away
-- VaerahVahrokha (2010-03-10 18:29:33)
Correction / addiction to above: turn off the AB after the first 1-2 BS are dead, also I meant to type 1 tracking enhancer (TE) not 2. 2 if you skip the DC
-- VaerahVahrokha (2010-03-10 18:35:02)
Using sleipnir, went in first with wrong resists (put on 2x em and 1x thermal) took the first group fine until other BSs started shooting at me. Went back and got recommended resists.

Halfway through, had 11BS on me at one time and tank still held fine. Battleships took an average of 20 (45sec) or so volleys to kill.

Overall very easy to do.

Click my name for my sleipnir fit.
-- JeroNica (2010-04-05 12:37:03)
was extremely easy in machariel my ingame name is jeremiah956 if any one needs help
-- DeathAssured (2010-08-12 20:24:54)
If you are using hybrids, I highly recommend fitting blasters loaded with iridium or iron charges. almost all the bs's orbit right at your optimal and go down very quickly. And if you are using sentries, they can take care of the few ships that stay away from you.
-- Soapy5 (2010-08-21 02:31:08)
Easily done in a passive shield tank vagabond, t2 10MN AB, 425 AC, 1x expl hardener, and 2x LSE2.
-- GergelyCzuczy (2010-11-07 02:42:10)
If you bring Machariel/Vargur with 3 invuls 1 explo hardener and DS LSB or XLSB, it's perfectly fine to aggro the entire pocket right after warpin and just sit there shooting things as they come <20km.
-- LtVanzi (2010-11-29 03:46:02)
I think the page may be out of date; group 4 aggro'd me as soon as they spawned.
-- KhaliaNestune (2010-12-10 17:27:17)
Easy.

7 800mm ACs, X-L C5-L booster, cap booster II, omni-tank (em invuln hardeners), and a 100MN AB, with 3x Gyro IIs, 1x RF Gyro, and 3x Tracking enhancers in the lows on a machariel.

AB and SB cap use rigs are in, too.

Go in, turn on your guns, and receive, like, 11m in bounties, 20 minutes later. Didn't even need to use the cap booster.
-- AsdayXyfu (2011-01-19 01:14:15)
If your gallente i'd just pass on this one, the key here is explosive dmg, you need to tank a lot of it and do dmg with it. Takes forever and you'll probably want to warp out a few times, bring a friend or just pass.
-- ShadowBuns (2011-02-19 22:18:58)
Did in a paladin
-- DeathPerfect (2011-02-20 13:28:19)
Regarding Gallente and Amarr: For angels you should use webs (instead of Tracking Computers), preferably faction webs so you can start reducing speed at 13+ km already. Lasers and rails work almost as well as fusion-loaded projectiles then.
-- MithorKarez (2011-02-21 12:29:12)
Valid XHTML 1.0 Transitional :: Valid CSS :: Powered by WikkaWiki