The Assault, Level 4
Last edited by MithorKarez
Wed, 09 Feb 2011 04:36 EST
Wed, 09 Feb 2011 04:36 EST
Faction: Guristas
Mission type: Encounter
Space type: Deadspace
Damage dealt: Kinetic / Thermal
Web/scramble: Elite Frigates
Extras: ECM Jammer (Battleships - Pith Eliminator/Exterminator and Elite Cruisers - Dire Pithum Nullifier/Annihilator)
Recommended damage dealing: Kinetic / Thermal; Max orbit 50km
Recommended ships: Rattlesnake, Raven, Drake, CNR, Megathron, Sentry Ishtar
Note: Spawn triggers are the highest bounty battleships in a particular group. Their names will randomly change, so be sure to identify them correctly via their bounties.
Pocket 1
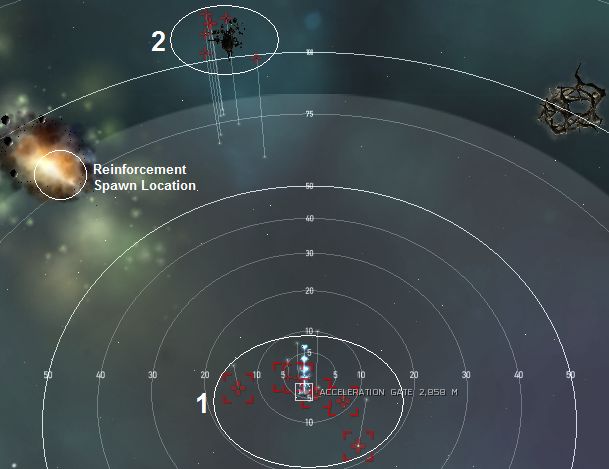
Auto aggro from Group 1 at warp-in. No aggro from Group 2.
Deploying your drones will aggro Group 2.
The Reinforcement group might aggro drones
SHOOTING (including target painting) the highest bounty battleship in Group 1 will trigger the Reinforcement Group spawn.
Important Notes:
- There's fleet aggro in this pocket. First pilot to warp in will get the aggro from Group 1, but no aggro from Group 2 as per normal.
- Remaining fleet members who warped in later will receive aggro from Group 2 when they start to open fire on Group 1.

Group 1 (Auto-aggro): (15-31km)
2x Elite Frigates (Dire Pithi Wrecker/Plunderer) Web/Scramble4x Battleships (Pith Dismantler/Obliterator/Destroyer) Trigger on attack (highest bounty battleship)
Group 2: (75-85km)
4x Elite Cruisers (Dire Pithum Inferno/Mortifier)3x Battlecruisers (Pithatis Assassin/Assaulter)
Reinforcement Group (Auto-aggro): (117-120km)
4x Battlecruisers (Pithatis Assassin/Enforcer)4x Battleships (Pith Eliminator/Exterminator/Destroyer) Jamming (Eliminator/Exterminator)
Structures:
Structures drop no loot.Tip
- The warp gate is unlocked. It is not necessary to kill any of the ships in Pocket 1.
Pocket 2
No aggro at warp-in.
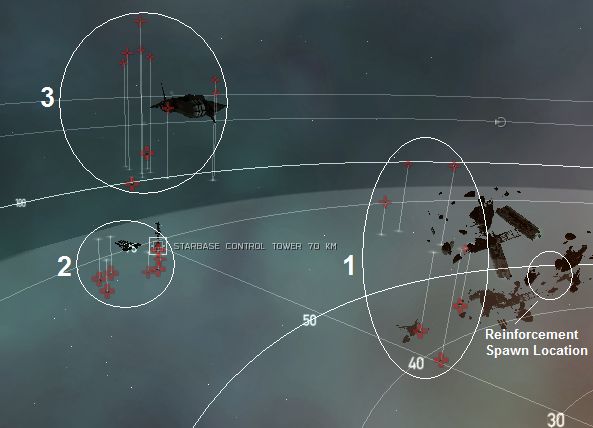
No pocket aggro if Group 1 or Group 3 is attacked (in any order). Drones can be deployed safely to attack these groups.
Attacking Group 2 will aggro Group 3.
Reinforcement wave will aggro on drones
SHOOTING (including target painting) the highest bounty battleship in Group 2 will trigger the Reinforcement Group spawn.

Group 1: Ship Carcass (50-60km)
1x Elite Frigate (Dire Pithi Invader/Infiltrator) Web/Scramble2x Elite Cruisers (Dire Pithum Abolisher/Eraser)
3x Battleships (Pith Dismantler/Extinguisher)
Group 2: Starbase Control Tower (65-70km)
2x Elite Cruisers (Dire Pithum Nullifier/Annihilator) Jamming (Nullifier/Annihilator)5x Battleships (Pith Extinguisher/Destroyer/Eliminator/Conquistador) ECM Jammer (Eliminator) Trigger on attack (highest bounty battleship)
Group 3: Caldari Station Ruins (110km)
2x Elite Frigates (Dire Pithi Infiltrator/Invader) Web/Scramble3x Destroyers (Pithior Guerilla/Renegade)
3x Battlecruisers (Pithatis Assaulter/Enforcer)
2x Battleships (Pith Exterminator/Extinguisher/Destroyer) Jamming (Exterminator)
Reinforcement Group (Auto-aggro):
3x Cruisers (Pithum Eraser/Inferno/Mortifier)4x Battleships (Pith Eliminator/Exterminator) Jamming (Eliminator/Exterminator)
Structures:
One Habitation Module drops 10 each of 2 low value trade goods.Tip
- Destroying the Starbase Control Tower will prevent reinforcement group from appearing. It will however, aggro Group 2 in the process.
- Recommended order of elimination : Group 1, Group 3 and finally Group 2 (also including Reinforcement Group when triggered).
- Mission is flagged completed once you have eliminated ALL ships in the original Group 3.
Blitz
- Pocket 1: Warp through the gate without killing anything.
- Pocket 2: Aggro Group 3 (only) and eliminate ALL ships in Group 3. Warp out.
Mining
Pocket1
60 Roids Veldspar = 2,402,354 but far away 100 to 130 KMPocket2
NothingCategoryLevel4
Blitz instruction on the second pocket states that you can destroy the ships that are furthest from you on warp in, but that you shouldn't move or use drones. However, after destroying the control tower on warp in (prevents any respawn/second wave, although not sure I needed to) I moved to sentry drone range of the furthest pocket (60-90km with Warden II's), and took them out. 3 battleships aggro you, but the remaining rat groups target your drones. But as they are sentries its easy to scoop to drone bay when drone shields are getting low, then deploy them again more or less immediately. Using this method it takes only a few minutes to rip through the furthest pocket of two BS's and a couple of frigs, and complete the mission. Hope this may be of use to drone users?
Just a small info on the Assault mission (lvl 4):
The Dire Pith Annihilator in the second pocket causes nearly complete stage aggro. But when this one is killed, and you warp in/out again, you can do the whole pocket in small groups.
Pocket 2: No Roids
Total: Veldspar - 2.402.354 Units
My optimal with Scorch crystals was 56 clicks because of the bonus to optimal range of the ship and gave me more DPS than the Abaddon. Jammed 3 times only.
Cerberus SS 16 (ran 3 times) - times jammed 13, 17, 24
Drake SS 19 (ran once) - 10
Nightmare SS 23 (twice) - 4, 6
Thought about using a passive shield Ishtar for this as you just get agro and release the hounds... jamming is pretty irrelevant then.
Am not sure if it makes any difference but I tend to mission in lo-sec...
pocket 1: Group 2 will agro drones. Tank the trigger.(Do not use drones. They will draw agro from group 2.)
Pocket 2: Snipe group 3. no pocket agro.
Bounty: 15,3 mill
Loot and salvage: 6,5 mill (Not good)
Mission: 2,45 mill
Total:24,25 mill
-- OmniPhil (2009-12-17 23:50:02)
This is a very common, and incorrect, notion about Guristas/Caldari ECM. For all intents and purposes, NPC EWAR is not bound under the same rules/mechanics as the player variants.
Basically, you can't counter it past killing the ship, not getting hit by it or using a fleet member to help be the decoy. This applies to all NPC EWAR, and not just ECM.
Cruise missile launcher IIx6
Drone Link Augmentorx2
Heat Dissipation Amp IIx2
Kinetic Deflection Amp IIx1
Invulnerability Field IIx1
'Copesetic' I Particle Field ampx1
Large Shield Booster II
Damage Control IIx1
Ballistic Control IIx2
Capacitor Flux Coil IIx2
Large Capacitor Control Curcuitx3
Hammerhead IIx5
Dissolution Sequencer with lvl IV skill -> 29 points
(a haiku)
16 mag strength
got jammed over and over
yay for warden 2's
Tanks entire aggro for both rooms ...
Shoot the triggers once each in both rooms, then orbit something and let your drones go slap-happy.
Dual-rep armor tank with AB cap stable.