Cargo Delivery, Level 4
Last edited by ConradEsc
Sun, 20 Feb 2011 07:34 EST
Sun, 20 Feb 2011 07:34 EST
Faction: Serpentis
Mission type: Encounter
Space type: Deadspace
Damage dealt: Kin/Therm
Web/scramble: NONE
Extras: Heavy sensor dampening
Recommended damage dealing: Kin (best), Therm (secondary)
Recommended ship classes: Battleship, Command Ship, Battlecruiser, HAC, Recon, Faction Cruiser (Blitz: any fast & tanked destroyer, frigate or shuttle)
Video: http://www.youtube.com/watch?v=CQx8scQm7L4 - Blitz
Single Pocket
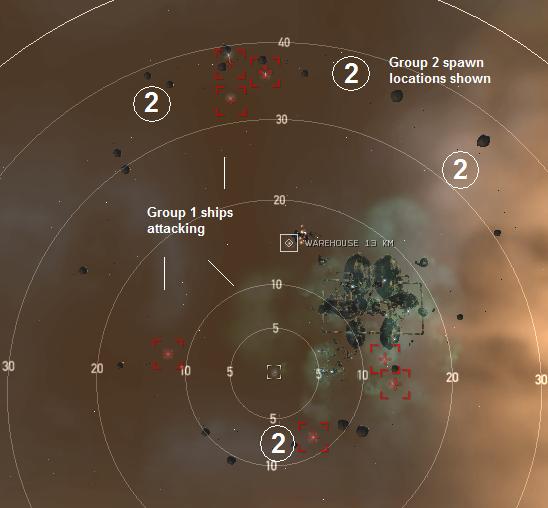
Group 1 spawns when you get within 16km of the Warehouse.
Killing the last (Corelum Chief Infantry/Sentinel) cruiser will trigger the Group 2 to spawn.
Group 1:
1x Elite Frigates (Coreli Guardian Patroller/Watchman) (Sensor Dampener)2x Cruisers (Corelum Chief Infantry/Sentinel) (Trigger)
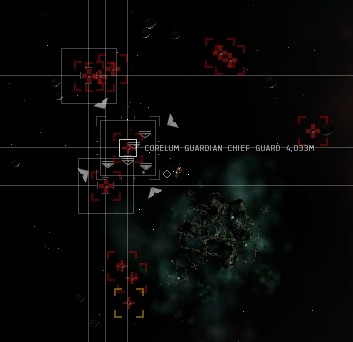
2x Elite Cruisers (Corelum Guardian Chief Guard) (Sensor Dampener)
2x Battlecruiser (Corelatis Captain Sentry)
1x Battleship (Core Port Admiral/Core Rear Admiral)

Group 2:
3x Elite Cruisers (Corelum Guardian Chief Defender)6x Battleships (Core Port Admiral/Core Rear Admiral)
1x Battleship (Dune Conal - Core Lord Admiral) (Drone Aggressive)

Tip
- Mission is flagged completed after Group 1 has spawned.
- Don't forget to pickup the Quafe from the Warehouse.
- Dune Conal will attack drones or support ships.
Tip
- To do this mission non blitz and control range (ideal for sniper setups) follow these steps:
- Warp to location in a shuttle & drop a bookmark
- Approach the warehouse until the first spawn arrives, warp out dock up and swap to your combat vessel
- Warp to your bookmark at any chosen range, destroy all spawns
- Collect the goods from the warehouse, job done.
Note: It's a really bad idea to try to collect the goods before you've destroyed the spawns. Warping out from the tangle of objects can be impossible.
Blitz
- Method 1 (Buy From Market)
- Buy the needed goods (Quafe Ultra)
- Put the Quafe in the hanger (where the mission agent is), then accept the mission.
- Warp to mission and fly towards Warehouse until Group 1 spawns.
- Warp out and close the mission with the agent.
- Method 2 (Fast Ship)
- Warp to the mission in a shuttle or very fast (super tanked) frigate with AB (as MWD does not work). An assault frigate is ideal for this.
- Open your cargo hold and approach the warehouse at full speed.
- Be ready to open the warehouse and drag the item to your cargo hold. Quickly warp out.
Mining
- 2,270,238 Unit Veldspar
- 60 Asteroids, average of 35k each
- Belt is a ring approx. 30km across
Bounties
6,459,228.75 ISKShips detail:
| Orbit | Max. Velocity |
Shield (hp) |
Armor (hp) |
Shield Resistances (%) | Armor Resistances (%) | DPS (hp/s) | ||||||||||
| EM | EXP | KIN | THERM | EM | EXP | KIN | THERM | EM | EXP | KIN | THERM | |||||
| 1x Coreli Guardian Patroller | 1,750m | 440m/s | 325 | 725 | 62 | 70 | 42 | 52 | 62 | 70 | 42 | 52 | - | - | 5 | 10 |
| 2x Corelum Chief Infantry | 23,000m | 360m/s | 1200 | 1500 | 48 | 58 | 28 | 38 | 48 | 58 | 28 | 38 | - | - | 15 | 27 |
| 2x Corelum Guardian Chief Guard | 5,125m | 320m/s | 1200 | 1500 | 81 | 85 | 74 | 78 | 81 | 85 | 74 | 78 | - | - | 11 | 22 |
| 2x Corelatis Captain Sentry | 6,000m | 320m/s | 1200 | 1500 | 50 | 60 | 30 | 40 | 50 | 60 | 30 | 40 | - | - | 21 | 37 |
| 7x Core Port Admiral | 37,500m | 280m/s | 4250 | 4750 | 62 | 72 | 42 | 52 | 62 | 72 | 42 | 52 | - | - | 33 | 56 |
| 3x Corelum Guardian Chief Defender | 28,750m | 320m/s | 1200 | 1500 | 85 | 90 | 72 | 79 | 85 | 90 | 72 | 79 | - | - | 18 | 27 |
| 1x Core Lord Admiral | 8,500m | 280m/s | 4750 | 5250 | 69 | 79 | 49 | 59 | 69 | 79 | 49 | 59 | - | - | 48 | 84 |
| 18 total ships | Averages/Totals: | 45,625 | 52,725 | 64.2 | 73.5 | 45.4 | 54.8 | 64.3 | 73.5 | 45.6 | 55 | - | - | 435 | 735 | |
CategoryLevel4
First step on in Drake, second - Raven (7 BS).
Group 2 have a 4 Elite Cruisers.
Group 2 dont aggro on drones.
Group 1 changed to :
1 BS, 2x Battlecruiser (Corelatis Captain Sentry), 1 Elite Frigate, 1Cruiser (Corelum Chief Infantry) -Trigger,1x Elite Cruiser (Corelum Guardian Chief Guard)
Group 2 :
4x Elite Cruisers (Corelum Guardian Chief Defender)
3x BS Core Port Admiral
2x BS Core Rear Admiral
1x BS Dune Conal
-Just had an interesting echo of Peon155's above--certainly makes completing it in a shuttle a bit more problematic. After swinging past, my pod and I bought some quafe and a new shuttle. May start planning to kill everything in the future. They seem to be asking for it.
-On the other hand, shuttle technique has worked multiple times since.
This is what I was using
Hi Slots
6 x XT Cruise launchers with wrath cruise missiles.
1 x Drone link aug
Low Slots
2 x Ballistic control system II
3 x Capacitor Flux Coil II
Mid Slots
2 x Ditrigonal thermal barrier crystalization - shield hardner
2 x non-intertial ballistic deflection field - shield hardners
1 x CL5 X-Large shield booster
1 x Shield Boost Amplifier I
Rigs
3 x Large Cap Control Circuit
was very easy. but good bounty and loot.
and i had no drone aggro in hole mission.
killing all the dampers first (see abow) helped very well!
no other ew-crap from the enemies.
this dune conal bs is very fast for its ship class!
one of the bs drops "reinforced metal scraps" its not sell-able at the market.
only in contract. never seen this befor. any one knows for what its good for?