Recon (1 of 3), Level 4
Faction: Sansha
Mission Type: Encounter
Space type: Deadspace
Damage dealt: EM/Therm
Web/Scramble: Elite Frigates
Extras: Tracking Disruptor (Elite Cruisers)
Recommended damage dealing: EM, Thermal
Recommended ships: CNR, Dominix (if fighting spawns).
Video: http://www.youtube.com/watch?v=BYPuIW7ASU4 - Paladin
Note: Part 1 (Recon Level 4) for each faction is unique.
Part 2 & 3 (Recon Level 4) are the same for all factions and can be found here
Pocket 1
Auto aggro from Spawn 1 after several seconds. New spawns will appear at an interval between 60-90 secs.
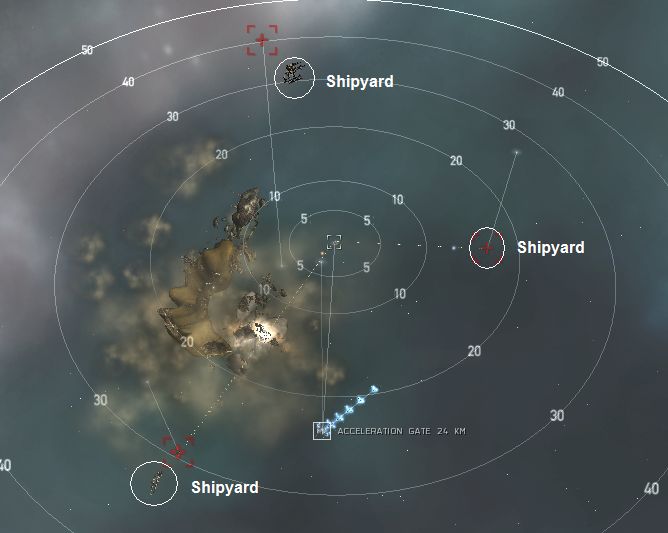
These spawns will start from the three Shipyard structures, each about 20-30km from the warp-in point.
Drones will get aggroed by the later spawns, so retrieve/deploy them as necessary to avoid damage.
Warning
- Once Spawn 1 has been initiated, the Shipyards will keep spawning ships regardless of your location. If you had warped out, there will be a full gang waiting when next you warp-in.
- The full gang's DPS estimate is ~900-1100dps.

Spawn 1 (Auto-aggro):
1x Elite Cruiser (Centum Loyal Fiend/Hellhound)1x Battlecruiser (Centatis Daemon/Behemoth)
1x Battleship (Centus Tyrant/Dread Lord)
Spawn 2 (Auto-aggro):
1x Elite Cruiser (Centum Loyal Slaughter/Execrator) Tracking Disruptor2x Battleships (Centus Tyrant/Overlord/Dark Lord)
Spawn 3 (Auto-aggro):
1x Elite Cruiser (Centum Loyal Fiend/Hellhound)2x Battleships (Centus Tyrant)
Spawn 4 (Auto-aggro):
1x Elite Cruiser (Centum Loyal Fiend/Hellhound)2x Battleships (Centus Tyrant)
Tip:
- You do not need to kill any hostile ships in this pocket. The warp gate is unlocked and sits about 24km from the warp-in point.
- You can use any fast frigate/cruiser (over 500m/s) to evasively tank Spawn 1 and quickly cover the distance to warp off through the gate.
- Mission is flagged completed once you have activated the gate and warped into Pocket 2.
Pocket 2
You will receive the mission completed message/journal update.
You can just warp off without needing to kill any hostile ships in this pocket.
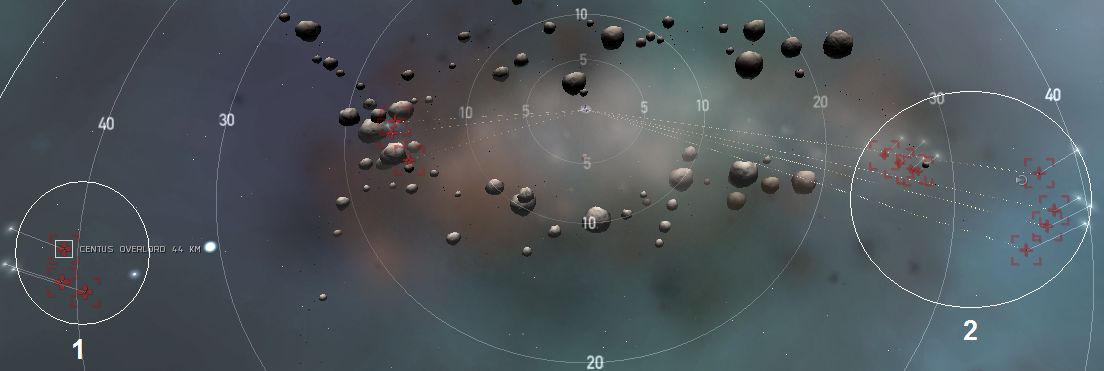
Auto aggro from Spawn 1 after several seconds. Next spawn will appear in 60-90 secs.

Spawn 1 (Auto-aggro):
2x Elite Cruiser (Centum Loyal Slaughter) Tracking Disruptor3x Battleship (Centus Overlord)
Spawn 2 (Auto-aggro):
4x Elite Frigates (Centti Loyal Scavanger)4x Elite Cruiser (Centum Loyal Torturer)
Mineable Asteroid:
- Pocket 2 has a huge asteroid field full of veldspar
Blitz:
- Pocket 1: Just fly to the warp gate and activate it.
- Pocket 2: Warp off after receiving the mission completed message/journal update.
CategoryLevel4
However the one loyal slaughterer spawn is a real pain in the ass for a pulse abaddon; hence I recommend beams if you're not using an apoc.
I recommend that you get a group to mine and haul it
First pocket: structures drop no loot.
Second pocket: kill disrupting cruisers first.
Bounty about 12 mil.
Salvage and loot was pretty bad: about 1.5 mil in loot and 2.5 mil salvage.
Two hints: keep moving (e.g. orbit the acceleration gate) and take out the smaller ships first.