Worlds Collide, Level 4
Faction: Angel and Sansha
Mission type: Encounter
Space type: Deadspace
Damage dealt: All damage types, see notes - Mainly Exp, Kin (Angel) / EM, Therm (Sansha)
Web/Scramble: All Elite Frigate types. Spy frigates only webs.
Extras: Target Painters (Angel Arch Gistum Crusher)
Recommended damage dealing: Exp, Kin (Angel) / EM, Therm (Sansha); Max orbit 44km
Recommended ships: Sleipnir, Raven, CNR, Drake
Note: Heavy drone aggro in Angel & Sansha Pocket 2. Setting drones to passive in order to avoid accidental aggro is recommended.
This is a time consuming mission if you do both the Angel & Sansha sides.
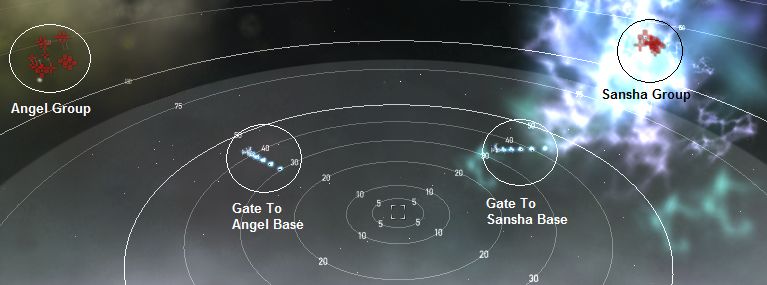
Pocket 1 (War Zone)
The two gates are locked until you kill the trigger ship from each faction. The trigger ships are ALWAYS a Gist War General and Centus Savage Lord from the respective groups.
NO aggro from the initial groups until you attack them. Each group can be aggroed independently.
Drones can be safely deployed to attack any group with aggroing the entire pocket.

Angel Group
4x Elite Frigates (Arch Gistii Impaler/Hunter) Web/Scramble1x Elite Cruiser (Arch Gistum Smasher/Crusher) Target Paint (Arch Gistum Crusher)
5x Battlecruisers (Gistatis Primus/Tribuni)
3x Battleships (Gist War General/General/Commander) Gate Unlock Trigger (Gist War General)
Sansha Group
3x Elite Frigates (Centii Loyal Ravener/Scavanger) Web/Scramble3x Battlecruisers (Centatis Specter/Wraith)
4x Battleships (Centus Savage Lord/Overlord/Beast Lord/Dark Lord) Gate Unlock Trigger (Centus Savage Lord)
Tip
- The NPC ships will not travel more than 30km from their respective spawn points.
- Drones/fleet members maybe targetted as the NPC ships reset their targetting when moving back to their spawn points.
- Move to a sniping position near the respective gate, roughly 75-80km (recommended distance) from the Angel Asteroid Outpost or Sansha Watchtower. They will travel back and forth in a merry-go-round while you snipe.
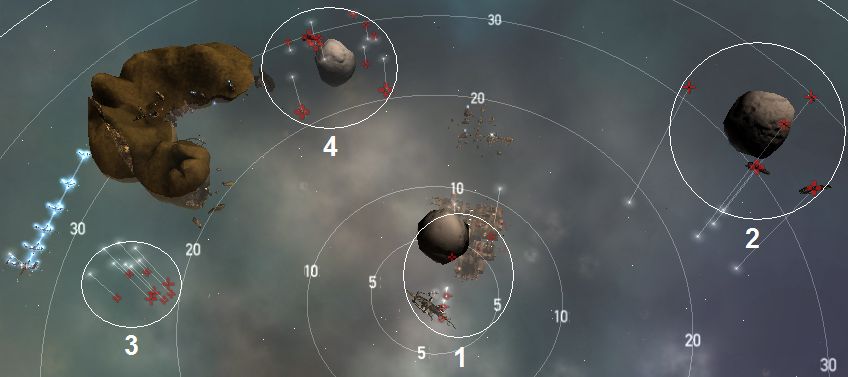
Pocket 2 (Angel Base)
On warp-in, Group 1 will auto aggro. The Angel Spy frigates do not scramble but they do web.
Warning
- DO NOT deploy your drones to attack Group 1.
- Any attack on the Angel Spy frigates by fleet members will aggro the entire pocket. It is safe however, for them to kill the sentry guns in Group 1.
- The FIRST ship that had warped into the pocket may kill the Angel Spy frigates without repercussions, as long as you stick to turret weapons/missiles.
NO aggro from the other groups until you attack them. Each group can be aggroed independently.

Group 1 (Auto-aggro):
2x Frigates (Angel Viper (named Angel Spy)) Web3x Angel Sentry Guns (Tower Sentry Angel III)
Group 2:
3x Battlecruisers (Gistatis Praefectus/Tribuni)2x Battleships (Gist Saint/Warlord)
Group 3:
5x Destroyers (Gistior Seizer/Thrasher)3x Elite Cruisers (Arch Gistum Phalanx/Centurion)
Group 4:
6x Elite Frigates (Arch Gistii Thug/Outlaw) Web/Scramble4x Battleships (Gist General/Commander)
Random Spawn (Auto-aggro):
1x Battleship (Angel Overseer)Tip
- Once Group 1 has been eliminated, it is fairly safe to deploy your drones for the remaining groups. Keep a close watch on your drones target to ensure that they do not stray and mistakenly attack a neutral group.
- Recommended order for elimination : Group 1, Group 2, Group 3 and finally Group 4.
- An Angel Overseer battleship will have a random chance to spawn in this pocket. The chance to spawn seems to be based on triggering the Angel Base warp gate in Pocket 1 and then completing the warp into this pocket.
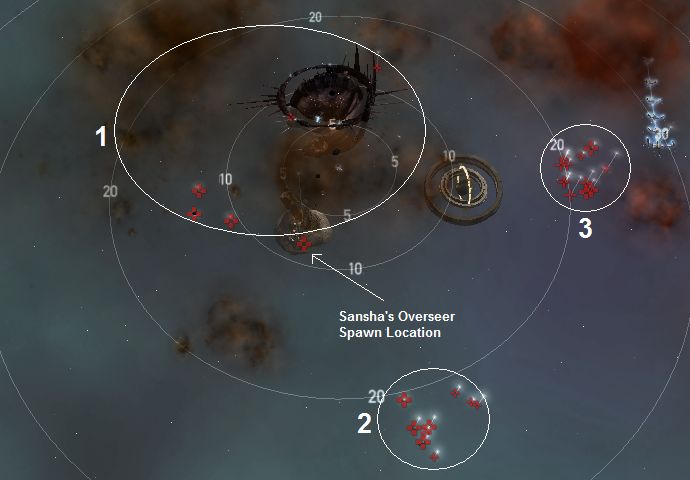
Pocket 2 (Sansha Base)
On warp-in, Group 1 will auto aggro. The Sansha Spy frigates do not scramble but they do web.
Warning
- DO NOT deploy your drones to attack Group 1.
- Any attack on the Sansha Spy frigates by fleet members will aggro the entire pocket. It is safe however, for them to kill the battleships in Group 1.
- The FIRST ship that had warped into the pocket may kill the Sansha Spy frigates without repercussions, as long as you stick to turret weapons/missiles.
NO aggro from the other groups until you attack them. Each group can be aggroed independently.

Group 1 (Auto-aggro):
2x Frigates (Sansha's Berserker (named Sansha Spy)) Web3x Battleships (Centus Dread Lord/Savage Lord/Dark Lord/Beast Lord)
Group 2:
5x Destroyers (Centior Monster/Abomination)4x Battleships (Centus Dark Lord/Beast Lord/Overlord)
Group 3:
4x Elite Frigates (Centii Loyal Scavanger/Ravener) Web/Scramble5x Elite Cruisers (Centum Loyal Hellhound/Fiend)
3x Battleships (Centus Savage Lord/Plague Lord/Mutant Lord/Slave Lord)
Random Spawn (Auto-aggro):
1x Battleship (Sanshas Overseer)Tip
- Once Group 1 has been eliminated, it is fairly safe to deploy your drones for the remaining groups. Keep a close watch on your drones target to ensure that they do not stray and mistakenly attack a neutral group.
- Recommended order for elimination : Group 1, Group 2 and finally Group 3.
- An Sansha's Overseer battleship will have a random chance to spawn in this pocket. The chance to spawn seems to be based on triggering the Sansha Base warp gate in Pocket 1 and then completing the warp into this pocket.
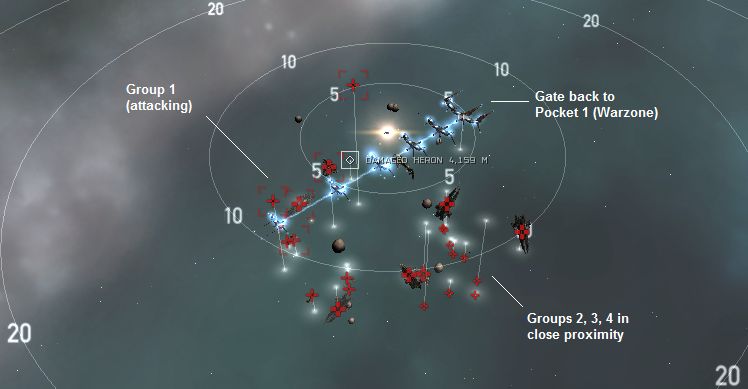
Pocket 3 (Research Outpost)
You will warp-in randomly around 5km from the Heron. In addition to the immediate aggro from Group 1, there is a small chance that one or more other groups will aggro due to proximity triggers.
If this happens, start moving away from the remaining neutral groups and check if the webbing/scrambling Elite Frigates have you locked. Kill them first if they have you locked.
If you are fleeted with friends, have them focus fire on Group 1 or any groups that have been aggroed by mistake.
The FIRST ship needs to act as an Fleet Commander and assign the appropiate targets. A common mistake is to have everyone shoot random or their closest target, which leads to the whole pocket being aggroed.
Sometimes fleet members that enter later will land differently and aggro groups that were unaggroed. If this includes the elite frigates and they scramble the new arrival, it can mean a quick death. All fleet members should have at least enough tank to survive until the scramblers are cleared. Having the lead ship tank the entire pocket is extremely difficult, as it can put down 1300-1500 dps, in a wide variety of configurations. Here are some (extreme) examples:
- 50% Exp, 31% Therm, 16% Kin, 2% EM
- 63% Exp, 15% EM, 15% Kin, 6% Therm
- 58% Exp, 23% Kin, 12% EM, 7% Therm
NO drone aggro for the entire pocket. You can deploy drones normally.

Group 1 (Auto-aggro):
3x Elite Cruisers (Arch Gistum Phalanx/Centurion)2x Battleships (Gist War General/Warlord)
Group 2:
4x Battlecruisers (Gistatis Legionnaire/Primus)1x Battleship (Gist Warlord/Malakim)
Group 3:
5x Destroyers (Gistior Thrasher/Seizer)3x Battleships (Gist Saint/Warlord/Malakim)
Group 4:
4x Elite Frigates (Arch Gistii Hijacker/Rogue) Web/Scramble1x Battleship (Gist Nephilim/Cherubim)
Tip
- Warping-in from either Angel or Sansha Base does not change the ship combination for this pocket. It will always be Angel ships.
- The mission is flagged completed once you have killed all ships in Group 1. The Heron will be unlocked and you can grab its crew to finish the mission.
Blitz
- Pocket 1 : Unlock the Angel Base gate either using a Zbikoki's Hacker Card (or killing the Gist War General). The card will be consumed upon activation.
- Pocket 2 (Angel Base): Kill or ignore the two Angel Spy frigates & Angel Sentry Guns. Fly directly to the gate and activate gate.
- Pocket 3 (Research Outpost): Kill all ships in Group 1. Grab the crews from the Heron to finish the mission.
- The Zbikoki's Hacker Card can be found in Zor's wreck in The Right Hand of Zazzmatazz or "Damsel In Distress" Level 4 mission.
CategoryLevel4
warp in: I've found you can unlock the gates to the cartel base just by killing the gist BS, so unless you are a die hard everything dies player you can leave the frigs.
I've just shot both the Angel Spy on the first gate in the angels room and I didn't aggro anything else. What I do is alight for warp before they get into 10k web range and shoot the guns. by this time I am webbed and slighty further back from the warp in point
It is safe to shoot them here.
Once Angel Spies/towers are dead, other enemies can be safely engaged, it doesn't cause whole room aggro anymore.
Pocket 2 (Sansha) Battletower dropped loot T1 Stuff
Pocket 2 (Angel) Battlestation dropped T1 Stuff
Pocket 3 No Loot Dropped
On the Sansha side, there are 3 Centus Overlords, and 1 Centus Savage Lord
I'm using a Navy Issue Apoc. In the lows: 3 heat sinks, 2 thermal, 2 kinetic hardeners II and a LAR II.
Correct shield hardner for each pocket is important. I use a rail (Blasters might be better or not) fitted rokh with T2 stuff and nav ammo. An afterburner is worth the slot, and you need lots of ammo too. The mission takes time. So don't make any plans for the next few hours. Very very hard mission. Watch your agro!!!
Pocket 2 (Angel): You might need to sacrifice drones so you can get some distance at the start (Angel spy) or tank them if no web. Maybe take out a group or two first. Warning: Group 4 warp/web scrambles like mad. Frigates are though to take out. (Lots of dps in here) If you mess up. Warp out immediatly and warp back in and start over.
Pocket 3: Get distance while shooting at group 1. Not all the pocket will agro at once. So shoot one ship and wait. Be careful they hit like a hammer.
Onlyd did pocket 1, 2a & 3
Bounty: 17,4 mill (pocket 1 & 2a: 9,3 mill)
Mission: 2,1 mill
Loot and salvage: 19,5 mill
Total: 39 mill
- Overseer, when it spawns, will cause pocket aggro when shot. Even if you shoot him from 40 km away.
- It's not true that you cannot use drones.
You can get to 20-25 km away, there's a building ahead of the warp arrival point that can be used as reference.
Then you can shoot at the two auto-aggro Angel Spy frigates, as long as the roaming other frigates (group 4's) don't cross your drones path. When this happens, I never got them to aggro but they aggro the drones and kill them in few seconds.
By watching the roaming frigates path so that they are 18km or above away off you, you can attack the two webbing frigates at will. Every time the other groups closes in again, you have to recall the drones fast.
For me, pocket 3 was consisted entirely of Blood Raiders, NOT Angels. Be prepared to warp out quick if you're equipped for Angels. The pocket was not too difficult once I came back with Blood gear.
From my recollection, the pocket had 3 groups. Group that auto-aggroed consisted of 3 elite cruisers and 2 battleships. The other two had cruisers/BS and also some frigates with web/scramble. The groups were very easy to tank one at a time. No problem using drones either.
In Pocket 3, the BS for Group 2 and 4 used Target painters, no initial aggro from Group 1. (shoot Group 1-2-4-3).