The Big Sting, Level 5
(Part 1 of 3)
Faction: Caldari
Mission type: Deadspace, no gate
Web/Scramble: All Frigates have 25-50% chance of Web and/or Scramble
Extras: (2) Caldari Energy Neutralizer Sentry IIIs, (2) ECM Jamming Cruisers
Damage dealt: Kinetic 71% / Therm 29%
Recommended damage dealing: Kinetic/Thermal
Recommended ships: Can be completed in (1) Maelstrom w/ passive tank and (1) Maelstrom w/ Shield Transporters in under 2 hours.
Direct warp into Deadspace. No gate.
Warp-In
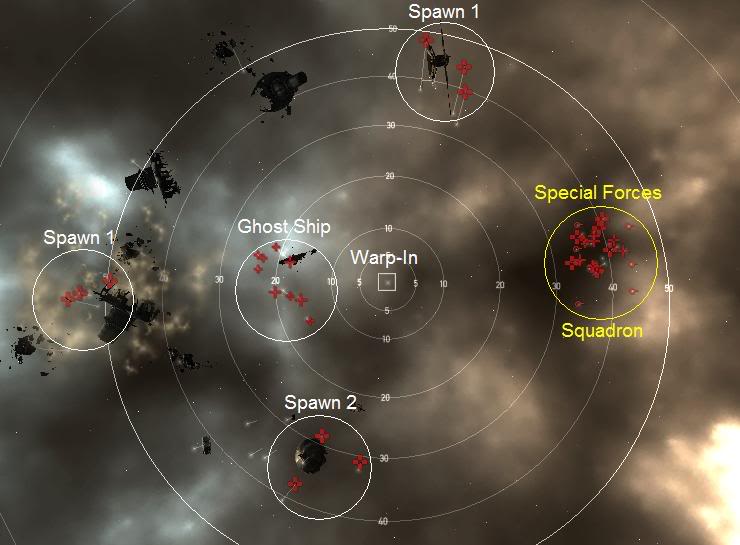
Note: Only the Special Forces Squadron that appears at 8 minutes after warp-in needs to be destroyed to complete this mission. However, if you approach to under 10km from the Ghost Ship, it will trigger numerous additional spawns that are optional to destroy. Realize that sometimes this accidentally occurs at warp-in. The Warp-In Beacon is 12km from the Ghost Ship, and your exact warp-in spot can be + or 2.5km from this beacon. If your warp-in does not land you within the 10km proximity, and if you dont want to trigger these spawns, then be sure to head away from the Ghost Ship after warp-in.

Objective Group
Special Forces Squadron: spawns at 35 45km away at 8 minutes after warp-in:4 x Frigates (Taibu State Nagasa/Shinai) orbits at 3k, Scramble/Web
2 x Cruisers (Taibu State Daimyo/Shugo) orbits at 18k, ECM Jammers
4 x Cruisers (Taibu State Bajo/Samurai) orbits at 33k
6 x Battleships (State Shukuro Shogun), orbits at 33k
4 x Tower Sentry Caldari III
2 x Caldari Cruise Missile Battery
2 x Caldari Energy Neutralizer Sentry III
Optional Spawns
Ghost Ship Spawn - Proximity Triggered: When you approach to under 10km from the Ghost Ship, there spawns:6 x Frigates (Taibu State Katana/Wakizashi/Nagasa/Shinai) orbits at 3-17k, Scramble/Web, by just shooting a frigate Triggers 1a
3 x Cruisers (Taibu State Bajo/Samurai) orbits at 33k, by just shooting a cruiser Triggers 2a
Spawn 1a
6 x Battleships (State Shukuro Shogun) orbits at 33k, Trigger 1bSpawn 1b
3 x Frigates (Taibu State Shirasaya/Suriage) orbits at 7k, Scramble/Web3 x Battlecruisers (State Shukuro Bajo/Samurai) orbits at 23k
4 x Battleships (State Shukuro Bishamon/Shogun) orbits at 33k
Spawn 2a
3 x Battleships (State Shukuro Shogun) orbits at 33k, Trigger 2bSpawn 2b
2 x Cruisers (Taibu State Bajo/Samurai) orbits at 33k4 x Battlecruisers (State Shukuro Bajo/Samurai) orbits at 23k
4 x Battleships (State Shukuro Bishamon/Shogun) orbits at 33k
Tips
- Special Forces Squadron deals 1301hp/s (Kin: 71%, Therm: 29%)
- If triggered, initial Ghost Ship spawns will deal an additional 1390 hp/s (Kin: 73%, Therm: 27%)
- Have the Types column available in your overview if you want to separately identify each Special Forces tower type and ship
(Part 2 of 3)
Faction: Caldari
Mission type: Deadspace, no initial gate
Web/Scramble: All Frigates have 25-50% chance of Web and/or Scramble
Extras: ECM Jamming Cruisers
Damage dealt: Kinetic 75% / Therm 25%
Recommended damage dealing: Kinetic/Thermal
Recommended ships:
Direct warp into Deadspace. No initial gate.
Warp-In
Pocket Summary: Timed spawns of 40 ships (12 Battleships, 10 Cruisers, 3 Destroyers, 15 Frigates) - 2,418 hp/s (Kin: 72%, Therm: 28%)Groups spawn at 2 minute intervals. Instant Aggro.

Group 1:
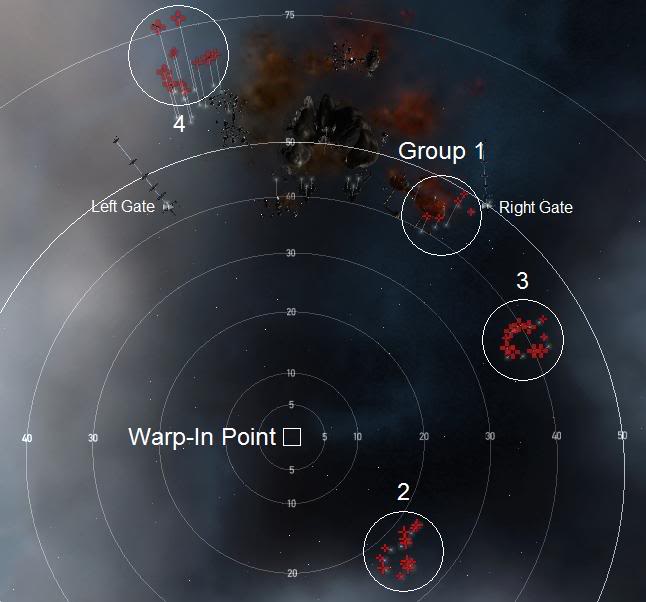
Present at Warp-in at 50k:5 x Frigates (Taibu State Nagasa/Shinai) orbits at 3k, Scramble/Web
Group 2:
Spawns 2 minutes later at 25k:7 x Frigates (Taibu State Nagasa/Shinai/Yari Daito/Katana/Wakizashi) orbits at 3-17k, Scramble/Web
7 x Cruisers (Taibu State Oni/Kanpaku/Bajo/Samurai) orbits at 25-45k
Group 3:
Spawns 2 minutes later at 40k:3 x Destroyers (State Shukuro Kamikazi/Choji) orbits at 17k
7 x Battleships (State Shukuro Shogun/Bishamon/Daijo) Orbits at 33-35k
Group 4:
Spawns 2 minutes later at 55k:3 x Frigates (Taibu State Nagasa/Shinai) orbits at 3k, Scramble/Web
3 x Cruisers (Taibu State Daimyo/Shugo) orbits at 18k, ECM Jammers
5 x Battleships (State Shukuro Shogun) orbits at 33k
Pocket 2 Right Hand Gate
Pocket Summary: Timed spawns of 35 ships (15 Battleships, 6 Battlecruisers, 8 Cruisers, 6 Frigates) - 2,484 hp/s (Kin: 78%, Therm: 22%)
Group 1:
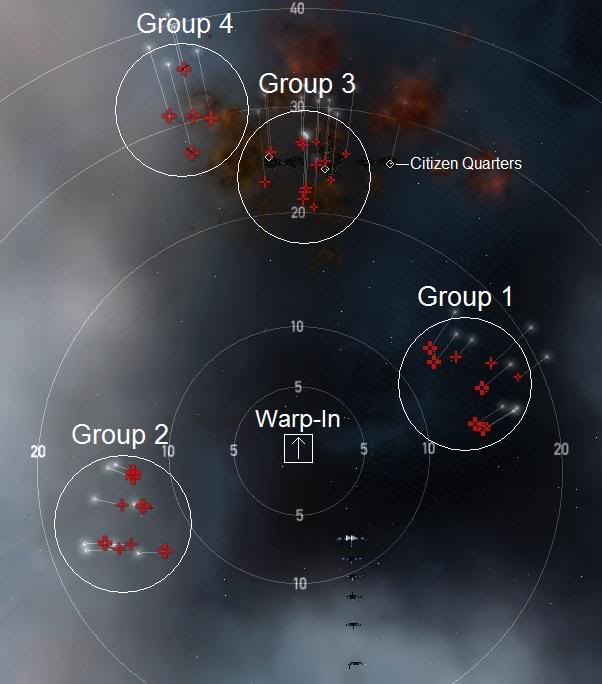
Spawns at 2 minutes after warp-in. Instant Aggro.2 x Frigates (Taibu State Nagasa/Shinai) orbits at 3k, Scramble/Web
2 x Cruisers (Taibu State Bajo/Samurai) orbits at 33k
5 x Battleships (State Shukuro Shogun/Bishamon/Daijo/State Zen/Oshiro) orbits at 29-35K
Group 2:
Spawns 1 minute later at 15km:3 x Battlecruisers (State Shukuro Bajo/Samurai/Kanpaku) orbits at 23k
5 x Battleships (State Shukuro Shogun) orbits at 33k
Group 3:
Spawns 3 minutes later at 30km:4 x Frigates (Taibu State Shirasaya/Suriage) orbits at 7k, Scramble/Web
6 x Cruisers (Taibu State Bajo/Samurai/Daimyo*/Shugo*) orbits at 18-33k, *ECM Jammers
3 x Battlecruisers (State Shukuro Bajo/Samurai) orbits at 23k
Group 4:
Spawns 1.5 minutes later at 35km:5 x Battleships (State Shukuro Daijo/Shogun/State Zen) orbits at 33-35k
Pocket 3 - Left Hand Gate
Pocket Summary: Average 2 minute spawns totaling 38 ships (13 Battleships, 11 Cruisers, 14 Frigates) - 2,369 hp/s (Kin: 73%, Therm: 27%)
Group 1:
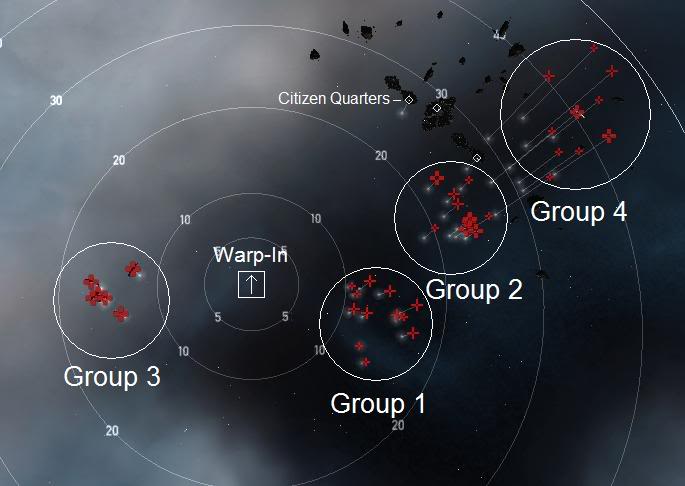
Spawns at 2 minutes after warp-in at 10km. Instant Aggro.5 x Frigates (Taibu State Nagasa/Shinai) orbits at 3k, Scramble/Web
7 x Cruisers (Taibu State Bajo/Samurai/Daimyo*/Shugo*) orbits at 18-33k, *ECM Jammers
Group 2:
Spawns 1 minute later at 20km:3 x Frigates (Taibu State Nagasa/Shinai) orbits at 3km, Scramble/Web
2 x Cruisers (Taibu State Daimyo/Shugo) orbits at 18k, ECM Jammers
5 x Battleships (State Shukuro Bishamon/Shogun) Orbits at 33-35k
Group 3:
Spawns 3 minutes later at 15km:6 x Battleships (State Shukuro Bishamon/Shogun) Orbits at 33-35k
Group 4:
Spawns 1 minute later at 35km:6 x Frigates (Taibu State Katana/Wakizashi) orbits at 17k, Scramble/Web
2 x Cruisers (Taibu State Bajo/Samurai) orbits at 33k
2 x Battleships (State Shukuro Shogun) orbits at 33k
- Retrieve 3 units of Citizens from the 3 Citizen Quarters at 25km (1000 m3/each), Objective
Tips
- No Energy Neutralizer Towers means this mission is Active Tank friendly
- Timed Spawns more often than not seem to aggro secondary teammates and drones
- Consider FoF missiles and setting drones to Aggressive for when you are unable to target because of Jammers
- Each pockets final spawn of Jammers + Scramblers can trap one in prolonged HEAVY damage
- Pocket 1s max damage dealing of all ships: 2,418 hp/s (Kin: 72%, Therm: 28%)
- Pocket 2s max damage dealing of all ships: 2,484 hp/s (Kin: 78%, Therm: 22%)
- Pocket 3's max damage dealing of all ships: 2,369 hp/s (Kin: 73%, Therm: 27%)
(Part 3 of 3)
Faction: Caldari
Mission type: Encounter
Space type: Normal Space, No Gates
Web/Scramble: All Frigates
Extras: NOS
Damage dealt: Kin 75%, Therm 25%
Recommended damage dealing: Kin/Therm
Recommended ships: Completed in (1) Maelstrom w/ Passive Tank and (1) Maelstrom with Shield Transporters
Warp-In
Distances to ships depends on your selected warp distance.1 x Carrier (State Izanaki) NOS
8 x Fighters (State Fighter) Fighter Group 1, orbits at 3k
After several minutes there spawns
14 x Frigates (Taibu State Nagasa/Shinai/Katana/Wakizashi) orbits of 3-17km, Web/Scramble
12 x Battleships (State Shukuro Shogun/Bishamon) orbits at 33km
Carrier (A)
As Shields are reduced a second Carrier (B) spawns and more Fighters as follows:At 50% shields
5 x Fighters (State Fighter) Fighter Group 2, orbits at 3k
And a second Carrier (B) with its fighters
1 x Carrier (B) (State Izanaki) NOS
8 x Fighters (B) (State Fighter) Fighter Group 1
5 x Fighters (State Fighter) Fighter Group 2, orbits at 3k
And a second Carrier (B) with its fighters
At 10% Shields
5 x Fighters (State Fighter) Fighter Group 3
5 x Fighters (State Fighter) Fighter Group 3
At 10% Armor
5 x Fighters (State Fighter) Fighter Group 4
5 x Fighters (State Fighter) Fighter Group 4
At 50% Structure
5 x Fighters (State Fighter) Fighter Group 5
5 x Fighters (State Fighter) Fighter Group 5
Carrier (B)
As the Second Carriers shields are reduced there spawns:At 40% Shields
5 x Fighters (State Fighter) Fighter Group 2 (B)
5 x Fighters (State Fighter) Fighter Group 2 (B)
At 50% Armor
5 x Fighters (State Fighter) Fighter Group 3 (B)
5 x Fighters (State Fighter) Fighter Group 3 (B)
At 10% Armor
5 x Fighters (State Fighter) Fighter Group 4 (B)
5 x Fighters (State Fighter) Fighter Group 4 (B)
At 50% Structure
5 x Fighters (State Fighter) Fighter Group 5 (B)
5 x Fighters (State Fighter) Fighter Group 5 (B)
Tips
- Mission occurs in normal space, so you can always warp to distances and to bookmarks farther away from the NPCs.- Warping to within 100km leaves plenty of distance that spreads out the aggro
- Carriers NOS has a range of 150km
- Fighters will immediately attack your drones when they spawn from the Carrier, but this can be used to your advantage
- Small Drones are invulnerable to the Fighters, as long as they are moving/attacking; and they are a great way to draw-off the Fighter's aggro.
- Have your small drones attacking the carrier when the fighters spawn.
- Mission is flagged complete after both Carriers are destroyed
There are 2 comments on this page. [Display comments]