Vengeance, Level 4


Last edited by HoshiIsamu:
+CategoryLevel4
Mon, 31 Jan 2011 12:33 EST

Faction: Angel Cartel
Mission type: Encounter
Space type: Deadspace with three rooms.
Damage dealt: Explosive/Kinetic, main boss (Hoborak Moon) spews EM torpedoes, 1147.5 base damage each
Extras: Drone aggro.
Web/scramble: Some elite frigates may web or scramble.
Recommended damage dealing: Explosive, Kinetic
Recommended ships: Machariel, Vargur, Tengu, Sleipnir, Raven, Maelstrom, Tempest, Drake (except for officer)
Video: http://www.youtube.com/watch?v=EIkr_MtQLWQ
Alternative (Shorter) Video: http://www.youtube.com/watch?v=KIsMxBl0094

Pocket 1

You land right next to pretty much all the rats. The furthest ones are about 50km away while the closest ones as close as 15km. The rats are in four groups, of which the closest sometimes aggros, but sometimes you land far enough that you can aggro one at a time. Watch your drone hitpoints, they might gain aggro from nearby rats as they have to work in close proximity. The furthest group is the hardest to tank both in this room and the whole mission.
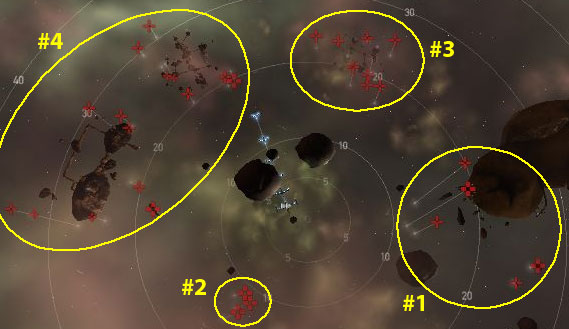
Room 1

Group 1: (10-25km) (Auto-Aggro)

3x Battlecruisers (Gistatis Primus/Tribuni)
2x Battleships (Gist General)

Group 2: (10km)

3x Battleships (Gist War General)

Group 3: (20km)

7x Cruisers (Gistum Marauder/Liquidator)

Group 4: (20-30km)

2x Elite Frigates (Angel Webifier/Viper) (Web/Scramble)
2x Destroyers (Gistior Haunter)
9x Cruisers (Gistum Centurion/Phalanx)
2x Battleships (Gist War General/Nephilin)

Pocket 2

Aggro from five battlecruisers at warp in. There are four groups total and each aggro seperately. Easy stage.

Group 1: (5km) (Auto-Aggro)

5x Battlecruisers (Gistatis Legionnaire/Primus)

Group 2: (25km)

3x Cruisers (Gistum Marauder/Liquidator)
3x Battleships (Gist Saint/Warlord)

Group 3: (30km)

6x Cruisers (Gistum Centurion/Phalanx)
1x Battleship (Gist Throne)

Group 4: (35km)

3x Destroyers (Gistior Defacer)
6x Cruisers (Gistum Centurion/Phalanx)
1x Battleship (Gist Nephilin)

Pocket 3

Aggro from one battleship, two battlecruisers and one destroyer at warp in. Firing on any of the rest aggros all.

Group 1: (2km) (Auto-Aggro)

1x Destroyer (Gistior Seizer)
2x Cruiser (Gistum Marauder)
1x Battleship (Gist Commander)

Group 2: (50km)

5x Elite Frigates (Angel Webifier/Viper) (Web/Scramble)
4x Battlecruisers (Gistatis Praefectus/Tribunus)
2x Battleships (Gist Warlord/Hoborak Moon)

Group 3: (60km)

2x Tower Sentry Angel III
2x Angel Heavy Missile Battery

Kill Hoborak Moon and the mission is complete. Battlestation in the final room drops worthless loot, mostly ammo.

CategoryLevel4
Comments [Hide comments/form]
If someone gets this mission, please go over the rat lists because I don't think they are correct.
-- ItsJupix (2008-05-25 14:07:07)
rat list is more or less correct
-- ClinkO (2008-05-29 00:27:17)
Because of his defender use (like 3 at a time), I could not kill Hoborak Moon at range in a drake with scourge or havocs. I tried to close range, but he didn't stop running until we reached about 180km away from the warp in spot, and then he turned around and stopped. I was then able to pop him.

I filled out the rat list properly as well.
-- KismetEer (2008-06-29 13:09:40)
I originally did this in a drake, which took quite a few shots per battleship to take down. I went back in a domi, and I think it took longer with sentries, so I wouldn't pull aggro from the tightly grouped spawns. If you can tank the first room with an omni tank, you should be fine though. Most battleships orbit closely, but the officer stays around 56km away.
-- KismetEer (2008-07-05 16:30:01)
Hoborak Moon is easy to take out it took me some time though I had to warp out a few times cuz I didnt outfit my Raven w/ EM hardeners. When I did this mission I tried to drag Hoborak out into around where you warp in, then I warped back out. All you have to do is not target him and he'll fly back to the battlestation. Get a webifier and get in range then unleash your torpedoes.
-- KingArt (2008-10-07 00:03:31)
I finished the entire mission except for Hoborak Moon in a mael, then docked grabbed my torp raven with an ab, and destroyed him. He seems to turn and fly towards you when his shields are at around 25% left. Can anyone confirm this?
-- ThePear (2008-12-19 15:08:36)
Ok, at the time I'm writing this I'm a 6.5m sp pilot.

I flew this one and ofc has to completely change fittings at the end on hoborack.

I fly a tanked domi and fit 5 dual250mm meta 4 railguns with web and used berzerker 1s to finish out the dmg. It took forever and i had to change his direction by flying around him so he didnt get to edge of mission and fly back to start position. Once i did that i webbed him and beat on his shields at about 7500m till he was gone.
-- ForTorn (2009-03-05 20:31:29)
in retrospect large blasters would be better in the afore mentioned setup
-- ForTorn (2009-03-05 20:39:00)
I run missions with dual rep Abaddon. Done this mission twice: first time I ran it, I refit for Hoborak with 2 SW-900 drones and an AB. Still took me a few minutes to catch him. Second time, I destroyed station before refitting. When I came back, Hoborak didn't run. Verify station destruction keeps Hoborak from running.
-- KhaiZeal (2009-03-07 17:22:07)
Hoborak is easy. just take a webbifier drone along. I also found this mission a lot easier with 2 nos's on a raven. Still takes time though. Never been able to do it in under 2hrs.
-- OovarvU (2009-07-07 07:03:28)
Hoborak Moon can be pretty stout, and none of the Frigates seemed to warp scramble.
Aggregate Bounties: 12.250 mill ISK
-- ExileZero (2009-09-12 23:44:39)
To take out Hoborak Moon :
1. don't target Hoborak Moon !!!
2. use an AB
3. use a webifier
4. use an EM tank
get in range, web and finish the job
-- ZenRol (2010-01-27 23:18:52)
Zen's comment is not exactly accurate. Hoborak can be easily taken out in a webless AB Machariel. Just have to remember he has 8500 shield HP, which is about 40-50% more than most Angel BSes, hence him taking a little longer than other Angel BSes.

T2 large AC Machariel does this mission in under 30 to 40 minutes. I've tested this myself multiple times.
-- ForteEXE (2010-01-29 09:32:27)
Pocket 1: One of the storage thingies dropped Nerve Sticks (drugs), other structures were empty, except the Asteroid Factory which I couldn't seem to kill
Pocket 2: Structures have no loot
Pocket 3: Only Battlestation has loot (mostly ammo)
-- ReawiDarkfly (2010-03-02 09:54:56)
This mission took me 1hr 50m to complete in a Drake. Very easy all the way until the end boss. Here, I went back to the station and fitted an EM hardener (not actually required) an AB and a third Ballistic Control Unit. My DPS was 343 after this and I still had a real struggle to break his tank. I circled Hoborak at 5000m and it took exactly 70 volleys of Caldari Navy Scourge to down him.
-- ThaThanka (2010-03-07 12:01:48)
realy easy in a machariel didnt have to warp hobarak moon melts under my repeating 800mm
-- DeathAssured (2010-08-17 17:56:10)
Hobarak Moon easy with a Drake, 3 BCUs, havoc heavy missiles and 5 Warrior Drones...
-- HeggAttack (2010-12-29 17:50:54)
Not difficult in a Maelstrom with this fit:

8x 800mm AC (Fusion)
X-Large Shield Booster, 2x Shield Boost Amp, Shield Exp Hardener, Shield EMP Hardener, 100mn Afterburner
3x Gyro, 2x Tracking Enhancer
5 warrior, 5 valkyrie, 1 berzerker

The take:
15M Bounties
2.5M Loot
10M Salvage
------
~27M Total

My angel battlestation dropped a 300k module. Even still, probably not worth the effort.
-- Xukan1 (2011-01-24 23:14:54)
Valid XHTML 1.0 Transitional :: Valid CSS :: Powered by WikkaWiki