Vengeance, Level 4
Faction: Sansha Nation
Mission type: Encounter
Space type: Deadspace w/gate
Damage dealt: EM/Therm, Kin (Draben Kuvakei)
Web/scramble: Elite Frigates.
Extras: Tracking Disruptor (Centus Beast Lord/Plague Lord, Centum Execrator/Slaughterer)
Recommended damage dealing: EM (best), Therm (secondary)
Recommended ships: CNR, Raven
Video: http://www.youtube.com/watch?v=FeeeVknfqa4 - Paladin
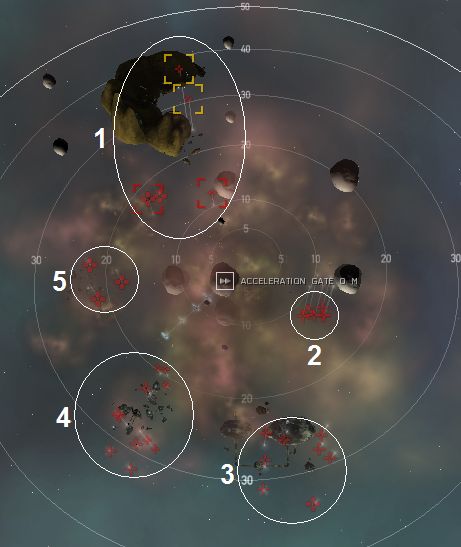
Pocket 1
All groups in this pocket have proximity aggro bubbles between 10-15km.
You may get aggroed by Group 1 at warp-in as its proximity aggro triggers.
DO NOT deploy drones to attack Group 1 as it will be targetted by Group 5.
Group 3 & 4 forms an aggro pair. Both will aggro if either one is attacked. Drones can be safely deployed as long as both groups have been aggroed.
Group 2 & 5 can be independently attacked in any order without drawing pocket aggro. You may deploy drones as per normal.

Group 1: Asteroid Mining Outpost (15-30km)
3x Elite Frigates (Sansha's Berserker/Demon) Web/Scramble2x Battleships (Centus Mutant Lord/Savage Lord)
Group 2: Veldspar Asteroid (18-20km)
5x Battlecruisers (Centatis Phantasm/Specter)1x Battleship (Centus Overlord/Savage Lord/Beast Lord) Tracking Disruptor
Group 3: Asteroid Construct (18-30km)
7x Cruisers (Centum Execrator/Slaughterer) Tracking Disruptor1x Battleship (Centus Mutant Lord)
Group 4: Asteroid Colony (16-25km)
5x Destroyers (Centior Cannibal/Devourer)6x Battlecruisers (Centatis Phantasm/Specter)
Group 5: Asteroid Factory (18-22km)
3x Battleships (Centus Savage Lord)Tip
- The warp gate is locked until all ships have been eliminated.
- Recommended order of elimination : Group 1 & 5, Group 2 and Group 3 & 4.
Mineable Asteroid
- Pocket 1 has a sizeable Veldspar deposits.
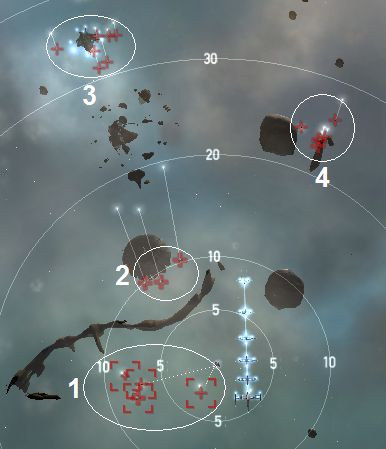
Pocket 2
Auto aggro from Group 1 at warp-in. All other groups remain neutral.
Each group can be taken out independently and drones can be deployed as per normal.

Group 1 (Auto-Aggro): Beacon (2-4km)
1x Destroyer (Centior Monster/Horror)2x Cruisers (Centum Mutilator/Torturer)
1x Battleship (Centus Savage Lord/Plague Lord) Tracking Disruptor (Plague Lord)
Group 2: Ruined Monument (25-30km)
3x Battleships (Centus Beast Lord/Plague Lord/Savage Lord) Tracking Disruptor (Plague Lord)Group 3: Sansha Outpost (30-35km)
7x Cruisers (Centum Hellhound/Fiend)Group 4: Veldspar Asteroid (26-28km)
3x Cruisers (Centum Hellhound/Fiend)2x Battleships (Centus Mutant Lord/Savage Lord)
Tip
- The warp gate is locked until all ships have been eliminated.
Structures
- Sansha Storage Facility drops NPC trade groods (dairy products, livestock, enriched uranium)
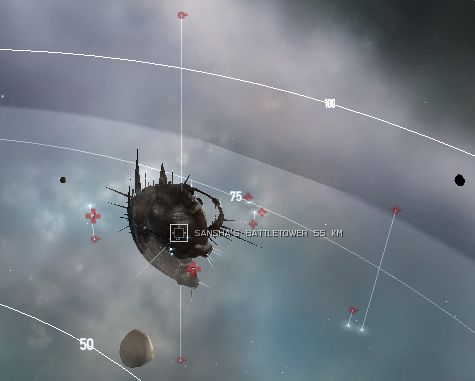
Pocket 3
No aggro at warp-in.
Sentry towers proximity aggro will be triggered if your ship moves to within 50km.

Single Group: (55-70km)
5x Tower Sentry Sansha III3x Elite Frigates (Sansha's Berserker/Demon) Web/Scramble
1x Battleship (Centus Overlord/Dark Lord)
1x Battleship Draben Kuvakei Wrath Cruise Missile
Tip
- It is recommended that your ship carry at least 2-3 weapon upgrade modules (e.g. Ballistic Control System, Heat Sink, etc.) when attacking Draben Kuvakei.
- Mission is flagged completed once you have eliminated ALL ships(tower sentries are not required) in Pocket 3.
Structures
- Sansha's Battletower drops T1 modules.
Blitz
- There is no quick way. Pocket 1 & 2 warp gates are locked until all ships have been eliminated. The last pocket must be cleared of ships to complete the mission.
Mining
- You can mine 1.995.000 Veldspar, 180.000 Scordite and 150.000 in all 3 stages.
CategoryLevel4
The "endboss" Draben Kuvakei has a higher armor repair amount than usual battleships. Taking him out with 1 BCS is a bit of a pain, but 2-3 BCS should do fine. The damage in the last pocket was pretty decent. I used explosive ammo for the towers and EM for all the ships.
Difficulty rating of pocket1+2: easy, pocket3: medium/hard.
This was because of the "magnetic retainment field" next to the base. Once I did shot it down, I could warp out again.
Btw, what's up with CNR and Raven being recommended ships for this mission when shields have weak EM resists? Amarr ships shine in this one, as the tracking disrupting is negligible. :-)
Had no problem warping out from last pocket, (or any other pocket).
reward: 3m
Bounty: 15.7m
loot+salvage: 750 m³ (absolute everything)
unrefined Meta 3/4 loot: 5.1m (4 items, guess I got lucky^^)
refined loot:
189k Tritanium
112k Pyerite
38.272 Mex
6941 Iso
1177 Nocx
119 Zyd
179 Mega
refined loot value at current domain average prices: ~3.2m
salvage value at current domain average prices: 11.2m (got 33 Armorplates :D )
all together: 38.2m
other notes:
- salvaging seems to be much easier now, most wrecks salvaged in 1 or 2 cycles including BS wrecks
- need confirmation on that: npc tracking disruption has been nerfed: while 5 cruisers were TD me, I still had a 16.9km optimal with scorch killing the cruisers with ease.
8xMPL II - Scorch/Conf, 4xCR II, 2xHS II, 1xSansha LAR, 1xTherm II, 1xEM II, Beta reactor control CPR I, 1xDC II, Hobgoblin II / Hammerhead II
6x CNHML
2x Pith-A Kin. Res. Hardener
2x Pith-A Therm. Res. Hardener
Dom. Shield Boost Amp.
Pithi-B Small Booster
4x CNBCS
Never went under 95% shield and final BS was easily take down. Dropped T1 Meta4 large armor rep.