The Rogue Slave Trader (1 of 2), Level 4
Last edited by MithorKarez
Wed, 09 Feb 2011 17:18 EST
Wed, 09 Feb 2011 17:18 EST
Faction: Sansha Nation
Mission type: Encounter
Space type: Normal
Damage dealt: EM, Thermal
Web/Scramble: Elite frigates
Extras: NA
Recommended damage dealing: EM, Thermal
Recommended ship classes: Battleship
Single Pocket
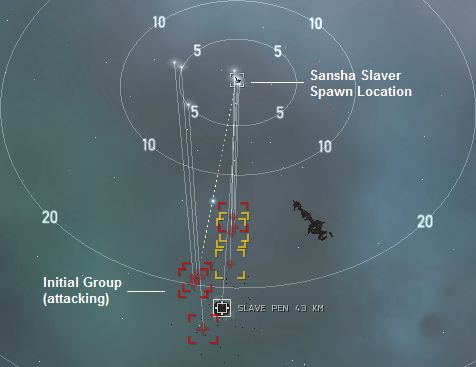
Auto aggro from the initial group at warp-in.
The Sansha Slaver battleship will spawn (near the Beacon) approximately 10 minutes after warp-in.

Initial Group (Auto-aggro): Slave Pen (42-52km)
5x Frigates (Sansha's Demon/Berserker) Web/Scramble2x Battlecruisers (Centatis Devil)
1x Battleships (Centus Dark Lord/Dread Lord)
Single Spawn: Beacon (2-4km)
1x Battleship (Sansha Slaver)Tip
- Mission is flagged completed after you have destroyed the Slave Pen. Don't forget to pickup the Prisoners for the agent.
- Fit Afterburner and/or Tractor Beam, slave pen sits +40km from warp in.
- Better yet: Warp and cancel warp, then warp at 0 km and you will land on top of the Slave Pen and in the middle of the initial group.
Mineable Asteroid
- The asteroid field yields - Veldspar (279K)
Blitz
- Warp to mission location, quickly cancel it. Then select your preferred distance to warp-in e.g. warp to within 10km
- Kill/ignore the inital group and destroy the Slave Pen.
- Pickup the Prisoners and warp out.
Downing The Slavers (2 of 2), Level 4
Faction: Sansha Nation
Mission type: Encounter
Space type: Gated Normal Space
Damage dealt: EM, Thermal
Web/Scramble: Elite frigates
Extras: NA
Recommended damage dealing: EM, Thermal
Recommended ships: Apocalypse, Ishtar, Dominix, Golem, Drake, CNR, Sleipnir, Abaddon
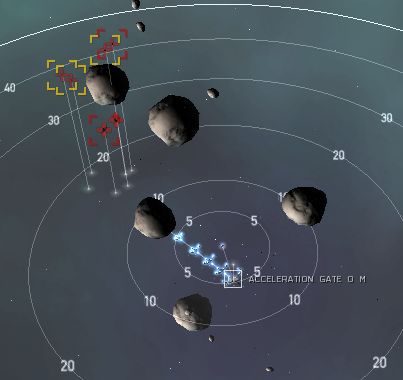
Pocket Entrance
The warp gate into the pocket is guarded by a small group of ships. They will aggro immediately after you have warped in.
You will need to eliminate all ships to unlock the gate.

Single Group (Auto-aggro): (20-25km)
1x Elite Cruiser (Centum Controller - Centum Loyal Fiend/Hellhound)3x Battlecruisers (Centatis Phantasm/Specter)
2x Battleships (Centus Lord/Slave Lord)
Single Pocket
Auto aggro from the initial group at warp-in.
Warning
- The incoming DPS is fairly heavy. Make sure your ship has a proper tank.

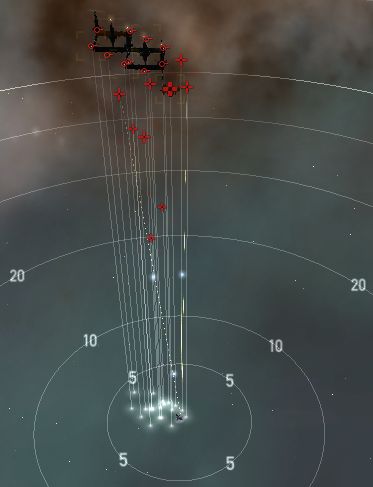
Single Group (Auto-aggro): (20-26km)
2x Sansha Stasis Tower2x Sansha Sentry Gun
2x Sansha Cruise Missile Battery (Paradise Cruise Missile)
4x Sansha Heavy Missile Battery (Thunderbolt Heavy Missile)
3x Frigates (Sansha's Demon/Berserker) Web/Scramble
2x Elite Cruisers (Sansha Slaver - Centum Loyal Hellhound/Fiend) Mission Completion Trigger (both ships)
3x Battlecruisers (Centatis Wraith/Specter)
1x Battleship (Centus Slave Lord/Plague Lord/Savage Lord)
Tip
- Primary targets are the warp scrambling elite frigates. Eliminate them as quickly as possible using your drones.
- Next eliminate the Cruise Missile batteries, battlecruisers and Heavy Missile batteries first, before you start on anything else.
- Heavy Missile Batteries can aggro multiple ships simultaneously.
- Better yet (if you have decent tank): Ignore everything but the two "Slaver" ships and kill only those and leave again, the frigates will not scramble usually.
Blitz
- Pocket 1: The warp gate is locked. Clear the pocket before activating the warp gate.
- Pocket 2: Kill any warp scrambling elite frigates (only if you are actually scrambled), then kill the two Sansha Slaver elite cruisers and warp out.
Mining
- Pocket Entrance: (6) 90K Veldspar, (10) 25K Scordite, (8) 50K Omber
CategoryLevel4
Drones were put on the scramming frigates on warp in (although I didn't get scrammed)
Second time I did this was in a CNR with T2 hardeners (2XEM, 2XTherm). Very easy as long as you kill the cruise/heavy missile batteries asap.
1 LAR, DC, 2x EM, 2x Therm (all T2) more than sufficient for tanking.
I was feeling lazy and didn't switch from omni resists. Entrance pocket didn't scratch the tank; second pocket required both LARs and was still slowly breaking my tank. Had plenty of time to reduce the incoming DPS though.
EM hardner, Thermal hardner, damage control, Large shield booster, and boost amp. Throw in a AB, and lots of autocannons. Easy
The DPS is fairly heavy though, because even with 85% em, and 80% thermal resistances, the shield still drops slowly, but again, plenty of time to reduce the dps.
No warp out needed, DPS wasnt bad at all.
EMP L rounds cut right through them.
Also, the second room is easily doable in a Drake. Take out the cruise missile batteries, (about 3 racks of Scourge) then the heavies (about 2 racks of scourge) then worry about the cruisers. After that it's a piece of cake. You might need to swap out for a higher DPS boat for the BS, though, (as with earlier BSs in this mission) as they have a _large_ armour rep amount, so it's more efficient to swap out.
Also, Rachel Voegel's comment _needs_ to be added to the article. Pocked 2 isn't deadspace.
Also, there were only 1 BS (Dark Lord), 2 BCs (Daemons) and 4 Frigates (3 Berzerkers, 1 Demon) in the initial spawn, but the amount of asteroids is still the same, and the "Sansha Slaver" BS still spawns after 10 minutes or so (didn't check my watch, but I had killed everything and wrote half this post before it spawned).
I might add another comment if the second part has also changed ...
Frigs never scrambled, only webbed. Shoot Cruise Missile and Heavy Missile Turrets first, after that the incoming DPS is pathetic.
Part 2: A more than sufficient tank for a passive CNR would simply be doubled hardners and 3 BCSes.
Part 2: (Pocket intrance easy) Read tips. Flew away from them in my T2 fitted Rokh. (Normal difficulty) ca. 25 min + clean up.
Part 1: The Centus dark lord tanked hella dps (repeated 600+ dps wreaking shots from my 4 dual 650 Ac's) The sansha slaver suck up on me when I was salvaging (Drunk lol) but was easily dispatched with afore mentioned 650's. about the same time to complete as the above Caldari scum...J/K (One of my alt's and some of my best friends are Caldari Scum) lol.
Part 2: I rushed through this so I could mine the omber. Added a Heavy SW-900 Webifier drone to the mix which let me instapop the little guys, The first room dished out boukup dps (hit all the sentries and stasis towers first), easily tanked, although I used 2 800 boosters.
Easy/Medium easy.
On the Second mission, took out missile batteries first - never broke tank.
Part 2:
Entrance: kill everything (ogre II)
Pocket: launch light drones on frigs (hobo > warrior), align till 30-40km, take down sentries with wardens (web, battery etc), and the two slavers. Other kills are optional of course.
2x cap recharge II, 3 omnilinks
2x Therm hard II, 1x EM hard II, 1x EANM II, 2x Cap relay II, 1x LAR II
2x CCC, 1 Sentry damage rig.
Bounty 4 mil
Loot+Salvage 2000m3 (including 1pc. meta-4 worth 3 mil)
Took a long time, and not enough DPS to get through the BS in the first missions armour.
I didn't try this more times, but is this mission (part1) possible to farm by leaving the slave pen intact? Anyone who can elaborate?
The new Sansha BS that spawned is the Sansha Slaver. As stated above, it spawns roughly 10 minutes after the others. It does not spawn again after that, so that's a no as far as farming it.
Here's the rub- the sentry batteries in the second room of the second mission appear to have trained their multitasking skill. I had redbox from every enemy in the room; but both my salvage fleet mate AND my drones (all five) were taking damage.
I wasn't using smartbombs, and my salvage fleety was >30 kilometers away in any case. Can anyone confirm?
No idea if Downing the Slavers was affected, CCP doesn't appear to publically publish such lists.
The Omber was removed in the Incursion 1.1.0 patch (Build 221279) and looks to have been replaced with little Veldspar roids instead.
Scordite seems unchanged.
Pocket Entrance: (6) 90K Veldspar, (8) 50K Veldspar, (10) 25K Scordite
Total ore from mining is now
Scordite 250 K
Veldspar 940 K
No changes noted with the ships and bounties.