Infiltrated Outposts, Level 4
Last edited by MithorKarez
Wed, 09 Feb 2011 07:07 EST
Wed, 09 Feb 2011 07:07 EST
Faction: Drones
Mission type: Encounter
Space type: Deadspace
Damage dealt: All types (more Exp/Kin, some EM/Therm)
Web/scramble: Elite Frigates (any Strain Alvi)
Extras: NA
Recommended damage dealing: EM (best all-round), Kinetic/Thermal (secondary)
Recommended ship types: Battleship, Battlecruiser, HAC
Note: The number of ships in a group will vary. This variance will be indicated in the ship numbers.
The number of frigates and elite frigates will vary, but the sum will always equal the total frigate numbers as reported.
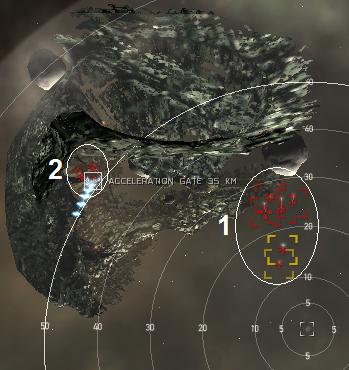
Pocket 1
Auto aggro from Group 1 at warp-in. Group 2 remains neutral.
Drones can be safely be deployed to attack Group 1.
The warp gate to the next pocket is about 35 km away.
The gate is locked until you have eliminated all hostile ships.

Group 1: Drone Bunker (25km)
3x Frigates/Elite Frigates (Sunder/Raider/Strain Splinter Alvi) (Web/Scramble)2x Cruisers (Viral Infector Alvum)
1x Battlecruiser (Defeater Alvatis)
1x Battleship (Swarm Preserver Alvus/Alvus Controller)
Group 2: Drone Bunker (48-52km)
3x Frigates/Elite Frigates (Decimator/Sunder/Raider/Strain Splinter Alvi) (Web/Scramble)3x Cruisers (Viral Infector/Bomber Alvum)
Tip
- The drone bunkers in this pocket are not part of the mission objective, so they can be ignored.
- The Gate to Pocket 2 is 30 km from the warp-in, an afterburner can be useful.
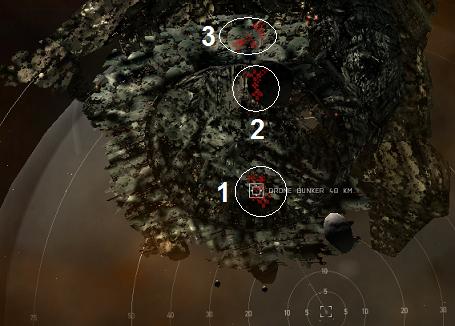
Pocket 2
No aggro at warp-in.
Attacking Group 2 (or its bunker) will aggro the entire pocket.
Attacking either Group 1 OR 3 will aggro Group 2.
Drones can be deployed safely, with one exception: Drones that get too close to any remaining neutral group will be attacked.

Group 1: Drone Bunker (45-50km)
6x Frigates/Elite Frigates (Sunder/Raider/Devilfish/Barracuda/Strain Splinter Alvi) (Web/Scramble)3-4x Cruisers (Devastator/Disintegrator Alvum)
1-2x Battlecruisers (Enforcer Alvatis)
1x Battleship (Alvus Controller/Swarm Preserver Alvus)
Group 2: Drone Bunker (65km)
2x Frigates/Elite Frigates (Devilfish/Barracuda/Strain Decimator Alvi) (Web/Scramble)1-2x Cruisers (Disintegrator Alvum)
2-3x Battlecruisers (Crippler/Enforcer Alvatis)
1x Battlecruisers (Rogue Drone Colonel - Striker Alvatis)
2x Battleships (Alvus Controller/Swarm Preserver Alvus)
Group 3: Drone Bunker (75-80km)
6x Frigates/Elite Frigates (Sunder/Raider/Devilfish/Barracuda/Strain Infester Alvi) (Web/Scramble)3-4x Cruisers (Devastator/Disintegrator Alvum)
1-2x Battlecruisers (Enforcer Alvatis)
1x Battleship (Alvus Controller)
Tip
- Mission is flagged completed after you have eliminated all ships in Group 2 and destroyed the bunker next to them.
Blitz
- Eliminate all ships in Pocket 1 to unlock the warp gate.
- Eliminate all ships in Group 2 and destroy the Group 2 bunker. Warp out.
Mining
- Pocket 1: 16 Roids Veldspar 1,210,715 Units
- Pocket 2: 49 Roids Veldspar 982,000 Units
7 Roids Scordite 810,000 Units
Loot
About 1,000 m³ of drone alloys.
CategoryLevel4
pocket1 fly directly to gate, shoot ships on your way
pocket2: attacking the nearest group to you aggros the second group next to it. I killed them all before anything happened really. Shield never went lower than 70% unboosted. Killing the 3rd group is easy too.
Lastly destroy the three "drone bunkers".
MY difficulty rating for this mission is: very easy for Level 4.
Any t1 non faction bs can finish the mission with 2x explo hardeners, 1x kin + 1x thermic + 1x Em hardeners.
Stop recommend very expensive ships when "normal" ships are easily able to finish missions please.
Shades of 'Tannhauser Gate'...
BS really doesn't shave much time off that given the massive amount of frigate size ships.
That depends on what you have on that BS, i have huge turrets but finish it in 10 - 12 minutes. All you i need against the small ships is 30 km's distance and 0.001 angular velocity. (Or less than 30 m/s transversal).
They go pop-pop-pop purty quick, those who make it through are dronefood.
they never broke my shields, but i used a tempest, 100mn AB II with LAR II, 2x explo II and 1x kin + therm II
I'm flying a sleipnir fitted with
7x scout autocannons, 1x HAM launcher
t2 large shield booster, t2 boost amp, t2 AB, t2 kin and exp hardners.
t2 damage control, t2 gyrostab, and the rest being cap flux coils.
Not being the best tanking ship in the world, I normally rely on a bit of speed to avoid fire from most hard hitting ships. However, after being webbed to a complete standstill, I could tank the entire third room with out taking any shield damage a single boost cycle couldn't fix.
They die pretty easy too.
Easy mission, but don't expect to get rich on it. No bounties, and the salvage / loot only came to 4 mil.
Pulverized the mission. Scorch was really handy for clearing this fast.
Just completed this.
This was the FIRST level 4 mission I have ever done/gotten. I was scared because i researched this mission before trying it and even let the bonus period slip waiting for corp mates to come from 0.0 to give me a hand as i read about people losing battleships to this mission. HOW!?!? i decided to try solo.. Lol.. i just cheesed this mission in 45mins. Here's my loadout.. oh and in the 2nd room, i got each pocket to come alone without aggroing group 2 etc.. and my drones seemed to bug and fight unlocked targets from 81km.. when they are supposed to limit at 35 ;)
:: 6x dual 180 M AC's :: 4x t2 LSE :: 1x meta2 Warp Stab ( useless ) :: 1x t2 Gyro :: 4x t2 SPR :: 2x arbalest heavy ass launchers. used standard emp and torrents. 2x t1 infiltarator medium drones, 2x t1 light acolyte drones. :: and uh.. oh yeah.. 4.6m SP.
i hope this help somebody:
condensed alloy - 51
crystal compound - 36
dark compound - 50
gleaming alloy - 150
glossy compound - 28
lucent compound - 97
lustering alloy - 114
motley compound - 173
opulent compound - 4
plush compound - 75
precious alloy - 198
sheen compound - 172
also notice that drone salvage is really poor, 1m or so
2nd room ~1.3M Veldspar (27x10K, 2x100K, 15x50K) 490K Scordite(7x90K)
managed to mine all but a few of the 10K roids and still get the bonus with Hulk, TII crystals at 1577M^3/minute
also salvage seems random as i got 4 trit bars and about 2.5M total salvage
Pocket 2: Fairly easy
Beautiful spatial design.
Bounty: 0
Mission: 2,2 mill
Loot and salvage: 5,1 mill
Total: 7,3 mill
Used a 10MNII AB and a Medium Shield Boost II and never got into my armor tank.
forgot to turn hardeners on, never dropped shields below 75%
Very easy mission
7000LP in < 20 min. Hope to get this one again soon.
http://www.youtube.com/watch?v=D8QdBkNocfM
High slots:
7 x XT-9000 Cruise Missile Launchers loaded with Paradise Cruise Missiles
1 x Drone Link Aug
Mids:
2 x Invulnerability Field II
1 x Ballistic Defelection Field II
1 x Explosion Dampening Field Field II
1 x Caldari Navy X-Large Shield Booster
1 x Caldari Navy Shield Boost Amplifier
Lows:
2 x Ballistic Control System II
3 x Capacitor Flux Coil II
Rigs:
3 x Large Capacitor Control Circuit
http://livestre.am/8MeU
Text can just be read if you fullscreen. Please excuse my habit of surfing/chatting during the mission, and in asploding the structures (I timewaste terribly) - this was just to prove the idea could work, and is really a 1st draft.
Please let me know if the video was informative, crap, whatever, and if you think it is a good idea, Livestream IS free, and they archive your videos for free too. I am looking into finding out how to download them as well.
Completed in a Nighthawk, 30 minutes because i screwed around, probably 20 if it was a 'clean' run.
Fitting in video.
I see why the mission can be hard, if you get webbed by the 4 drones in pocket 2, you're in trouble. I went from full tank to 20% structure in about a minute and a half. If you sick your drones on them right away, it's a cake walk.